Thursday, September 6, 2012

What's Been Going On...

It's been a summer of DIY projects, home decorating, lots of swimming and tons of fun with friends and family around here. :) It has also been so hot and dry that most of the work happened indoors and we are just now doing the damage control from the drought outdoors. 

We didn't get to go on the road trip we planned on taking but after all that has happened and all the progress we've made in the new house, we absolutely wouldn't have it any other way. We'll take the road trip some time in the next few months or so. We have plenty of time for trips, but we need to make our house a home first and foremost.


desksidebyside 
John built me a desk. I painted it this beautiful aqua. Then he bought me the hydraulic bar stools for me to sit on while crafting. I was so tickled because he knew I was getting frustrated with all that I was seeing both online and in stores, so he went on a search on his own. He knew exactly what to get and why he believed I would like them... and surely enough when he brought them home, I was happy as a clam!

Here's one truth about me, I can't do just one project at a time. When I get started on one, all these other ideas pop in my head and depending on the availability of energy and funds, I get started on a couple or a few more. So while this desk was being built, I was working on picking out paint for John's music room. You can see it here.

musicrm2 

John was very firm about wanting gray for his room... And gray he got. I'm married to a very selfless man, he will do anything for me and will give me the moon and the stars if I asked for it. So when he asks for little things like his own room, or gray paint or my old desk, I give it all to him. No questions asked.

I even cut the Pearl logo on his bass drum head for him. He wanted a sticker, was getting ready to buy one but soon as he realized it was not gonna look good on his set or probably not going to be the size he wanted , he sweet talked me into busting out my Cricut and cutting out the logo for him. Guess what he got? A Pearl logo. Yes, that logo on the bass drum is cut by YOURS TRULY, thanks to my handy dandy die cutting software that makes cutting all kinds of images possible. :)

musicrm1 

We made this snare drum lamp too! I wish I took photos of the process, but it's so easy anyone can do this. It's the coolest thing in his room except I have to figure out a way to conceal cords. I'm just not satisfied with wrapping the cord with fabric. Given that this room took some work and a lot of patience to put together, I want it to be clean. And I don't wanna have to keep fixing it.

The lantern below is what inspired the drum lamp. I found a couple of brand new Ikea light kits during one of my thrift store excursions for $cheap so the next time I go to World Market I snagged two paper lanterns and got the two for $5 after discounts. :) I made this whole thing myself in two afternoons.
Untitled 

And here it is hanging in my pink/craft room. Such a gorgeous light piece!

pinkroom 

With all the chaos going on with my craft room getting put together and John's room too, I painted our old wax-ruined end table. It's now sitting in my pink room underneath my coffee filter lantern.
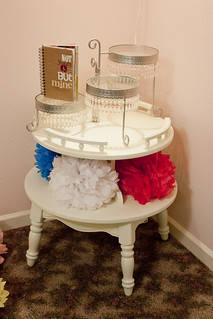
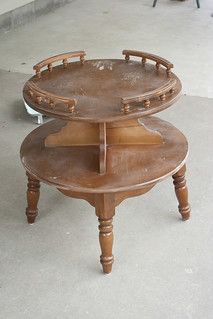
craftroom24endtable 
I also sewed curtains for John's music room, I made a wristlet/s for my iPad out of scrap fabric, I made camera straps out of scarves I bought last year, and worked on Project Life at the same time while planning Vacation Bible School, too.  
ipadcover5
IMG_20120807_150425 

Recently, I painted our hallway. I painted it pewter, a color I wouldn't have chosen for our two or three other houses in the past. We've gotten a lot braver with our color choices this time around, I believe. The wall hangings are by me too. The pictures on the right are from Flickr.

hallway4 

Then, an idea about a fabric-covered button turned into a coffee table converted into a tufted [end of the bed] bench that John and I are so so so in-love with!

bench4


bench5

We already had the coffee table and I had it sitting on the foot of the bed since we moved here. It had two glass tops that I had to constantly clean because, yes, it's glass! Glass is a pain on the neck! And it didn't used to be while, it used to have a maple-ish finish, but I thought I'd paint it so it would match our bed side tables. Then some fabric, foam, batting and the fabric covered buttons I made, and I have a bench.

I'm sure I forgot something, but I'll share some more pics here soon. :) 

Laterz gators,

signature

Tuesday, July 17, 2012

Fun Project: Swag Light

Hello all! :) I have been doing some organizing and some changing around here [in my craft room]. This is the very first day that I have actually crafted in here, so I am very excited. This wasn't a difficult project I did today but it did take some time. In fact it's really not done yet but it will be tomorrow. I promise.

Remember this?


paperlamp

and this?

pompoms 

Not my husband but the striped paper lantern! lol Some hot glue gun burns, 300+ coffee filters and an hour and a half later, it is now this!
 
lantern_signed 

This was fun to make... except it took time and patience. It was easy too. I really really love how it looks now and I love how it looks like I have colorful bulbs inside when all it is is a reflection of the colorful stripes that are on the paper lantern. The photo below shows the process. Just kind of crumple up your coffee filters and hot glue them all one by one on your paper lantern.

Materials:

Paper Lantern [I got mine from the World Market for $2.50]
Coffee Filters [I used about 250-300]
Hot glue gun and glue sticks

Untitled

I took the pompoms down by the way. But maybe they will look better when I put them back up given I don't have too many patterns and too much texture going on anymore. :)

This right here was where I got the idea...


Laterz gatorz,
signature

Saturday, July 14, 2012

[Pink Craft Room] Progress...


desksidebyside 

Hey friends! This is as far as I we got today... Here is the desk. I still haven't decided what I want to do with the small cubbies in the front but the yellow bucket is starting to grow on me. :) The past couple of days, we have been doing a lot of measuring and planning. A built-in is going up on the wall where the pom-poms are. The husband is also building me two leaning desks book cases on the opposite side.

A lot of my stuff are stored in [open] bins but not in moving boxes anymore. I have easy access to them now, but I still want a better storage solution for them. It's just nice when everything is where I could see them so I don't forget that I have them.

The sheers on the windows are from my Mom-In-Law. She has awesome taste for window coverings and a whole lot of different things where home decorating is concerned and she knows I love to decorate and dress up windows, so I mostly inherit what she has and I have no problems at all using them in our house.

My Cricut Expression and my Cricut Cake finally have a home and they are accessible! I don't have to take them out of the closet or their caddies every time I want to use them. John [the husband] also got me two cool bar stools today as part of my anniversary gift to go with my desk. He knows me too well! We searched and searched all week for the right ones, it was very frustrating... So when he saw the stools online yesterday, he was like "Let's get them!"

pompoms 

paperlamp 

And here he is modeling my paper lanterns. :) We don't have an Ikea close by, but during one of my thrifting trips, I bumped into a set two sets of brand new Ikea swag light kits for a buck a piece! I didn't have to think twice because the paper lanterns were already a part of the plan, we just didn't know that they were gonna light up too. [Score!] The picture on top of the one above, we are trying to figure out whether the pom-poms are staying or not or if we need to put all white or stagger the length of the pom-poms from the ceiling. Yeah, tough decision! lol But, the lanterns are definitely staying where they are at and a couple pieces of cable hiders and we should be set.

I still have a bunch of pieces going in this room. And will share photos as I finish them. This pink room will be a work in progress for a while... just until it all feels right and until our brains our fried from thinking of stuff to do or add or build.

This year's anniversary sure has been the best so far. It tops the one year when John built me a craft room from pretty much nothing. You can see it here. :) Maybe next time I see you all, I can give you a tour of the room.

Til the next post!
signature

Tuesday, July 10, 2012

It's been a While...

Hello folks! I know I have disappeared from the blogosphere for a long long time. All my bloggy friends will agree that three months is like forever in BlogLand. So sorry friends, there's just been too much going on here and I have been choosing to spend time with the husband before marching season formally starts [which is gonna be like in two weeks!] From then on, we rarely see each other anymore until about the end of October. He is a very busy man. It's a real gift that I've chosen to not to work, because I don't have my own schedule to complicate things. We've been through all that and it is NO FUN. We have been spending lots of time here:

poolnight 

So we have done quite a few things in the new home in the past three months. :) Lots of planning, lots of going back and forth trips to the home store and made a few beautiful changes. I will give you the deets on those later in the week. Today, I just want to show my husband off and this really really nice anniversary gift he has given me. He built me a craft desk for my new craft room! :)

johnatwork 

It was sooo hot last week, we decided he will build the structure inside... But as the project progressed, it got bigger and bigger, so we kept inching into taking the job outside as close to the pool as possible. Our patio was a wreck until about 10 PM last night. But that's okay, I kept telling myself the rewards are well worth it.

Here he is [below] checking if the whole thing is level before I painted the top. :)

bluedesk7 

And here she is [below] sitting in the pink room. :) Excuse the mess... I am currently working on putting the room together. My stuff has been all over the place since we moved about eight or nine months ago. We should be good after we get this room put together. I actually made sure about three weeks ago that John's stuff would have a place to go before we started working on mine, because his stuff are bigger and they take space and he needs them for work and for PLAY most of all. He eats, breathes, drinks music every single day... him and his drums, guitar and his geeky music tech stuff are connected at the hip. :)

bluedesk11
 Note: The shopping list in the project plan wasn't right. John ended up a couple of boards short... but a few minutes spent looking around in the garage and he was back in business. He had some extra boards laying around in his garage from past projects we've done. So make sure you do the math on the cut list before you get on your way to the lumber yard.
We got the project plan for this desk from Anna White. Like every project in her website, this desk isn't hard to build as long as you use the right tools and you stick to the plan. It can be done in two days. The only thing that stopped him was the heat. I didn't want him to roast outside too long in the 106-degree weather... 

The color is called Aquatint from Sherwin Williams. I thought I wanted my desk to be white until I saw this color, then I had to have it. The yellow bucket is just there for practice. I'm not sure if I really want buckets as opposed to baskets... We'll see. The goal is to have this whole room put together before the week is over. We will see about this too. *winks*

We still have a couple of building projects lined up for this room, which is all mainly storage... and I believe we have decided we are going to take our time. But I will post more photos soon as I get all my stuff out of the moving boxes and have better photos of this room. I can't wait to start crafting again!!!

Laterz,
signature

Tuesday, April 17, 2012

Sour Cream Box Candy Holder {A DIY Photo Toturial}

Hello friends! I hope everyone is doing great today and have had a nice start to your week. :) I'm hoping all of you are happy, healthy and smiling as I am today. I have something I would like to share with you all. I've made these things before but have never taken pictures of them. I always believe they make great party favors or in this case, a perfect way to re-package leftover Easter candy.

We gave away Easter baskets at church and although we had lots of kids come, we still had some left over. I know the kids will eat them anyway if I just put them in a candy bowl. But I thought, I would re-package them to give them a better experience. Every box is a surprise because I didn't mark what each box has in them. Kids love that. They love surprises! Also, it will help me use papers in my stash that I know I won't be using. For this project I used papers from an older Cosmo Cricket kit I got a couple years ago. 


9

You will need:
  • Candy {I used jelly beans, M&Ms, etc}
  • scrapbook paper cut in 4 inches x 4 inches {I used heavier weight scrapbook paper}
  • Scor-Tape {but you can use an ATG gun or any strong dry adhesive}
  • paper trimmer
1. Lay out your materials. Cut your paper according to size.
1 

2. Apply adhesive.

2 

Or, you can punch the edges to make it pretty. I am using an EK Success scallop punch.

4 

 This is how it will look after you punch the two sides.

 5

Then, apply adhesive on three sides.
10 

3. Roll your paper into a cylinder shape {like below}.
 6 

4. Pinch one end shut. Now, with the other end still open, fill your box with candy. :)
 7 

5. When you feel like you have put enough candy in your box, pinch the open end shut the opposite way you shut the one end. Thus, forming the shape of a sour cream box. :)

 8 

6. And you got you some cool candy boxes!!!


11

Hope you all have a great rest of the week!!!

Hugs!
signature
Related Posts Plugin for WordPress, Blogger...
designed with love by beautiful dawn designs