Friday, June 24, 2011

Birthday Card


If there was anything that my Husband couldn't live without is his coffee and his music. The man eats and drinks music and coffee all day long. That's why I always say, if there is anything we splurge on in our house, it is coffee because John drinks 4-5 cups a day and when you have a husband who has become a coffee snob because of the Keurig, you gotta be willing to spend the money to keep ordering the good coffee. But I don't really mind, because I love good coffee and pretty much all the K-cup brands we buy have not disappointed us one bit. 

So for his birthday, I made him this card. : ) The coffee cup is a stamp from Hero Arts called cup of coffee. And I used a Cuttlebug folder to dry emboss the kraft cardstock for the background. I used the Versa Marker for shading. I am no good at the shading yet, and I don't think I will be ever good at it. lol

He was pretty excited when he saw it... It had the two things he couldn't live without. And he did have a really happy birthday!

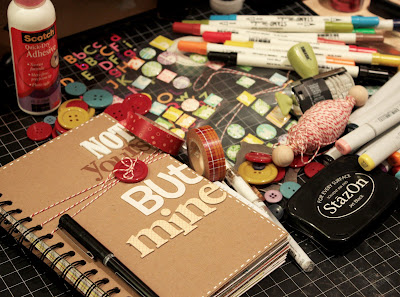
My Junque Journal


After years of thinking about it, I finally started a junque journal... and I made it myself! I got lucky and got the Cinch Bindery Tool really cheap. And by cheap I mean, 70% off what they are going for on the market now. I believe We R Memory Keepers just launched the Cinch 2 and that's why the regular Cinch went down in price ridiculously in some stores online. 

What inspired me to start a junque journal is the K&Company SMASH BOOK! I have watched the Smash video over and over it is not even funny. The Smash book actually reminds me of something I used to do in high school only I let other people write or share their art in it. I went through a ton of composition notebooks! My friends and I had a great time passing it around leaving messages to each other on there, we put post cards, receipts, book pages, book marks we have totally re-purposed and altered. The Smash Book is so similar to that except with cooler, heavier weight paper in it. : ) I have purchased the little bits and things that go with it, but haven't bought the book itself because I intend to stick to my crafty DIY skills and use the enormous amount of scrapbook paper I have acquired in who knows how long. It makes my husband happy when he sees me cutting through those things and making stuff out of them.


This book cost me close to nothing to make. The only purchase I made was the o-wires, which cost $2.50 at Archivers, everything else I already had in my stash. The covers are recycled. They came from the chipboard backing of paper stacks. I have a ton of them and I keep them all to make into templates when I make cakes, but this time I cut them to make into my book covers. I put envelopes in them, made pockets, and cut cardstock and paper in 8.5" in x 5.5".


I haven't done much or gone crazy or anything to it. But will put a post on here when I do. : )


Have a great weekend everyone!


I have linked this post up in Cheryl's I'm Lovin' It Fridays Post!


Tidy Mom

Sunday, June 19, 2011

Happy Father's Day

It feels like forever since my last post. So I made sure I put something on here for Father's Day. It's not just Dads we are celebrating on Sunday [with my family here], we are also celebrating my Dad-in-Law's and the Hubs' birthday. : ) For five years now, every year in June for Father's Day, I make something for my four favorite men to celebrate them. This year, I went almost all handmade and homemade.


Swivel Tractor Card for Uncle Charlie


Typewriter card for Grandpa R and Grandpa Bruce

Shirt Card for my Dad-in-Law

I also made snickerdoodles for Charlie. He LOVES them! While I was at it, I went ahead and made an extra batch for Grandpa R. :) With a little bit of baker's twine, a button, a stamp, and some scrap paper, and a ton of love in the snickerdoodles, plastic containers are suddenly worth gifting. <3 


Have a wonderful wonderful Father's Day all! :)


Friday, June 3, 2011

I am Not Good at Before-and-Afters

Hey friends! I thought I'd pop by and leave another note before I get started on my wrestling match with my linen closet and possibly my dining room too. John is matching wits with the wiring in our entertainment center. He shares the same woes as those who put their TV on top of the fireplace. The bulk of the wiring has been contained, except that there are still some sticking out from behind the satellite dish box and the home theater system receiver. I could've worked on it without having to go through the trouble of removing the cable hider caps and re-doing the whole thing... But I know well enough that if I intervened, we would just start arguing and then nothing will get done. So, I am leaving it all up to him and I found me something else to do. ;)

I would show you before and after pics but I am no good at that. I would plan on it and chicken out at the last minute. So I will be posting after pictures, and maybe some before ones [if I don't have a nervous breakdown while looking through them and trying to decide which ugly ones to show the world]. 

The past few days, I have been doing little projects and have done a little bit of looking around. And this is one of them:


This isn't what it's going to look like just yet. I am thinking about changing it up later when my vinyl order comes in and when I decide what font I am actually going to use. This is the beauty of vinyl decals, they are not a lifetime commitment. You can take them off and put new ones on as much as you wish, wherever you want them... and since I cut my wall quotes myself, it makes it even easier and a lot cheaper. The decals on this wall need to look good because it is the first thing everyone sees when people come in from the kitchen. 

John and I saw this quote in a wall decal kit years ago at a local store... We liked it, but didn't have anywhere to put it. Our first house had textured walls, and there was no way it could've worked. So we kind of just forgot about it until I stumbled into it again a week ago. I saw it online at a wall decal store. And I knew I had to use it. 

I am no wall decal master, but if you decide to DIY your wall quotes, get a software that will make you cut your words already lined up or enables you to weld words together that way they are easier to mount.  Also, use some scrap vinyl to do some practice cuts on so you don't cut through the backing... because if you do it would be much harder to get the backing off of your die cuts. [I am talking from experience here, it is not pleasant!]. I usually set my blade depth on 4, pressure on medium, and the speed on medium. Settings could vary between your machine or the kind of vinyl you use. So you will need to get to know your machine before you commit to cutting your vinyl. And lastly, have a level handy so everything goes on the wall straight. I use painter's tape for guide lines instead of using a pencil, trust me, you don't want to draw lines on your wall, they do not come off easy!!!

Laters gators!


Thursday, June 2, 2011

Deep Dark Chocolate Cookies and Strawberry Preserves


Hi all! We are officially on summer break... Well, my husband is! But I said WE because when he is on break, I am on break too... On break from making supper early on Tuesdays [he has marching band rehearsals every Tuesday, so dinner has to be served right before he leaves at 5:30], I am on break from the buzzing of our numerous alarm clocks in the morning and I am on break from hearing the awful stories from work John feels he has to share with me once in a while. Yay!!!

To celebrate, I made the cookies pictured above. Those are not internet photos, I took those myself soon as the first batch of these tasty goodies came out of my oven. They are called Deep Dark Chocolate Cookies. There is a similar type of cookie that I used to love to eat, they are called Chocolate Crinkles. But I believe the ones I made today are waaaaaaaaayyyy better! I found this recipe in Epicurious and found someone make an attempt on it on their blog but the cookies didn't turn out so good... Although they tasted really good, my very first attempt on this recipe didn't turn out great either. The cookies melted into each other. 

And I blame it on two things: 

1. The recipe wasn't written good. I believe recipes like this, need side notes! For example, let the dough/batter sit on your counter or refrigerate for at least 20 minutes to give the dough/batter time to stiffen, making it easy to roll.

2. Temperature accuracy is crucial in the making of these cookies... It follows the same principle as   making molten lava cakes. High temperature bakes your cookies/cake fast and ends up with a fundgey or gooey  interior. So if your oven is not at 400 degress F, your cookies will melt into each other, and that isn't going to be very pretty. So if you don't have an oven thermometer, make sure you preheat your oven for at least 15 minutes... It takes about that long for your oven to reach the desired temperature.

I also made strawberry preserves for John today... He has already made me promise to make him some peach preserves when they come in season. My husband will gobble anything that is sweet. He will definitely do anything for me if I promise to pay him in baked goods or sweets. These preserves I make are easy. I buy the pectin and follow the instructions in the box except that half of the fruit I mash, the other half I put either in the blender or food processor. John likes some fruit chunks in there, but not too much. I don't like preserves much, so one batch [7 cups] lasts him all year. He doesn't like sharing either. lol He hogs pretty much every baked good and every sweet thing that I make unless someone wants to trade goods.


Here's the cookie recipe, you can get the printer-friendly version here.


Deep Dark Chocolate Cookies
Adapted from Epicurious
Nonstick spray
1 ½ cups bittersweet chocolate chips (about 9 oz) divided
3 large eggwhites, room temperature
2 ½ cups powdered sugar, divided
½ cup sweetened cocoa powder
1 Tbsp cornstarch
¼ tsp salt
Preheat oven to 400 degrees. Spray 2 large cookie sheets with nonstick spray. Melt 1 cup chocolate chips in microwave, stirring twice about 2 minutes. [I melted my chocolate in a double boiler]. Cool slightly.
Using an electric mixer, beat eggwhites in large bowl to soft peaks. Gradually beat in 1 cup of the powdered sugar. Continue beating until meringue resembles soft marshmallow creme. Whisk 1 cup sugar, cocoa, cornstarch and salt in a medium bowl to blend. On low speed, beat dry ingredients into meringue. Stir in lukewarm chocolate and ½ cup chocolate chips (dough will become very stiff). [let dough sit on your counter or fridge for about 20 minutes before rolling, the dough will stick to your hands and fingers if you don’t wait]
Place ½ cup sugar in a bowl. Roll 1 rounded tablespoon of dough into a ball; roll in sugar, coating quickly. Place on prepared sheet 2 inches apart. Bake until puffed and top crack for 8 minutes. Cool for 10 minutes on cookie sheet then transfer onto cooling racks.
Makes about 18 cookies.


Enjoy!


Related Posts Plugin for WordPress, Blogger...
designed with love by beautiful dawn designs